User's Guide
Index
Overview
SLMotion is a toolkit for off-line processing and analysis of video files. While originally created for the purpose of analysing and annotating sign language corpora, the components provided with the program can easily be applied for a multitude of other purposes.
SLMotion is built around a modular design. One of the main principles in the design has been the ease of extensibility. The users may easily create new components in either C++ or Python. This process is described in more detail in the Component Reference.
The architecture of the program follows a black board model where components take input at their turn and update a common result database. Control over the process is provided through Python scripts, which the users may write themselves or use scripts provided by someone else. Ideally, we hope that there could be at least a small community that could share their scripts and components with one another.
The primary way to use SLMotion is through a CLI program that determines the way the data should be handled and feeds it to the Python script. When the script is available, invocation will be easy and the program can easily be parallelised for running on a grid of computers, e.g. to analyse thousands of videos in a corpus at one time. The results may be numerical features that are stored in a file, or the results may be visualised and output to a video or an image sequence, and the feature data can also be used to create ELAN compatible annotations.
Execution model
The execution of a single analysis project could be divided into three stages: the preprocessing stage, the processing stage, and the postprocessing stage. In the preprocessing stage, the Python script sets up the chain of components that do the actual analysis, and sets up all other sorts of options, such as listing features that are to be extracted in the postprocessing stage and the visualisation options. Components are created using proxy-objects that store the component specific options.
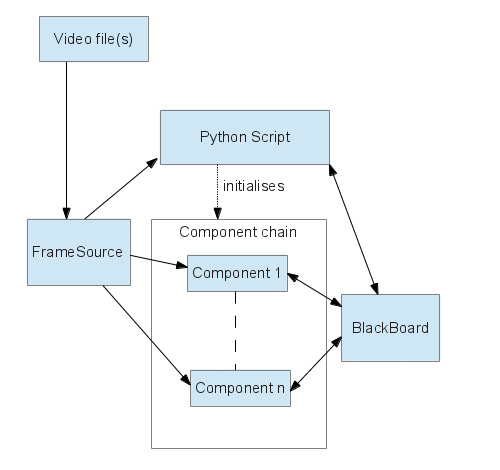
The main processing stage is triggered by a call to the process() function on the Python side. At that time, the control is passed to C++ code. Each component is then called in the order specified by the script. The components pass through the video one at a time and store their results on the black board and fetch any results a preceeding component may have created from the black board. Essentially, the components should not be aware of each other, except through the black board.
The black board is just a shared database for analysis results which may contain arbitrary data indexed by a string key and a frame number. This model is shown in Figure 1. While the Python script has little control over execution at the processing stage, it can access the blackboard both before and after this stage, e.g. to manually inject data or postprocess it somehow.

Fig. 1: the execution model
In the postprocessing stage, numerical features are extracted from the black board according to a specification given in the Python end. Also, the desired visualisations are applied and output to a video file or an image sequence. Also, rules known as annotation templates are used to create ELAN compatible annotations which are then output to an EAF file.
Command-line Interface
The default way to use SLMotion is via the slmotion executable. A detailed description of the parameters can be output by invoking the program with the --help parameter. Only the most important parameters are covered in this document. A typical invocation would be as follows:
slmotion --elan-out elan.eaf --ann-template-file anns.ann --feature-out features.csv \
  -o visualised.avi --script foo.py bar.avi
This would translate to following: run analysis script foo.py on bar.avi, storing the feature data to features.csv, writing annotations to elan.eaf according to annotation templates specified in anns.ann while outputting the visualisations to visualised.avi.
Note that most of these options are not mandatory. Only the input file and --script are mandatory (or, well, the script parameter can be left out if options are specified in a configuration file, but that method is beyond the scope of this guide and is deprecated).
Some of the most important command line parameters:
- --help Prints the command line quick reference
- --version Prints version information
- -v Enables verbose mode. By default, the program outputs hardly anything to the user. This mode can be used to track the progress.
- --debug <int> Sets debug message level. Level 0 corresponds to the default. Level 1 corresponds to the verbose mode. Levels higher than that are not recommended because the messages are quite likely useless to the end user.
- --config <filename> Read configuration from some other file rather than from default.conf. Use of this parameter is discouraged because the Python script will override most of the options set in the configuraiton file.
- -o <filename> Sets video output file for visualisation output. The type is determined by the extension. If you want to output an image sequence, add %f magic marker to the filename and use a still image file extension. The magic marker is then replaced by the frame number.
- --script <filename> Sets the Python script to use.
- --feature-out <filename> Sets the file where extracted numerical feature data is stored in CSV format.
- --elan-out <filename> Sets the file where annotations are stored in ELAN format.
- --ann-format <string> By default, the output video files have an extra line of text added at the bottom. This option will set the text. The default would be "Frame %f". The format string is set in C printf fashion, and the following magic markers are recognised:
- %f: current frame number
- %t: current annotation text (as given in the annotation file, see the --ann-file command line parameter)
- %l: the PicSOM label. If you do not know what PicSOM is, you may ignore this variable.
- %%: The % sign.
- --ann-template-file <filename> Sets the file for annotation template description. The file should be an XML file conforming to annotationtemplate.xsd schema. See default.ann for a practical example.
- --complex-visualisation <string> Sets the visualisation script. The script is a semicolon-separated list of statements. For a description of the statements, please refer to setVisualisation() in the Python API documentation.
- --disable-annotation-bar Removes the extra text line from the output video files.
- --frame-cache-size <int> By default, input frames are cached to reduce I/O overhead. However, if the video is long, this may consume a very large amount of memory. Setting this option to 0 will prevent this from happening.
- --work-dir <directory> Sets the working directory for the duration of the program run. This may be useful, e.g. in the case that the program is run on a computer cluster and is not invoked by the user themself. The program will look for certain files in its working directory and this will prevent the unnecessary need for copying those files or doing some other tricks if the files are still accessable in some known directory.
- --in-csv-file <filenames> This option is used with the CsvImporter component. It should be set to a comma-separated list of input files.
- --csv-fields <string> This option is used with the CsvImporter component. A specification string for determining how to handle the CSV data. Please refer to the component reference for more details.
- --out-dump-file <filename> This option is used with the BlackBoardDumpWriter component. A filename for blackboard dump output. If the file has .gz extension, GZip compression is applied automagically.
- --in-dump-file <filename> This option is used with the BlackBoardDumpReader component. A filename for blackboard dump input. If the file has .gz extension, the GZip compressed file is decompressed automagically.
Graphical User Interface

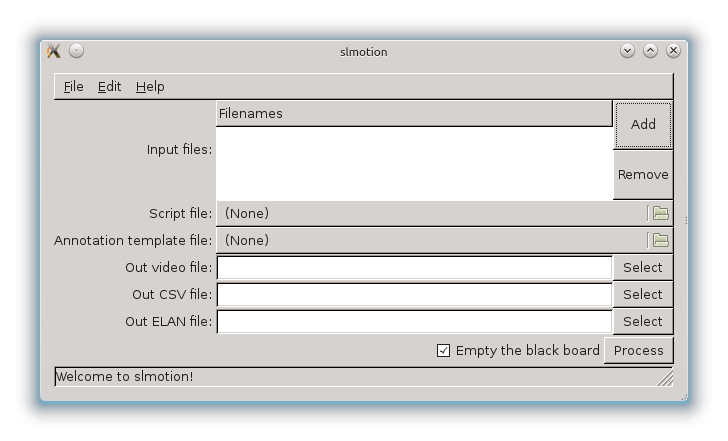
The graphical user interface can be invoked by using the slmotiongui executable. This executable does not take any command-line parameters. The main window can be seen above. Most of the options should be fairly self-explanatory, and they have direct equivalents in the command-line interface.
If the Empty the black board checkbox is unticked, the black board will not be emptied when a new process is started. That is, the results from the previous run are preserved. This is particularly useful if you want to load black board dumps (found in the File menu).
Black board content can be viewed with the Black Board Editor which can be found in the edit menu. However, as of the moment this guide is being written, the editor is limited to viewing only, and even as such does not support all data formats employed by the components.